My mother taught me a lot of things, but the thing that stuck most firmly (apart from “always make a boy wrap his present”) was a passion for DIY.
Even when I’ve had money to burn, I still hated the idea of paying for something I could make myself for half the price.
So when I started getting a lot more femme with my style and wanting more jewelry, I figured out how to make it myself.
Don’t get me wrong, I’m not at home smithing my own sterling silver rings (yet). But I have discovered there is a huge, wide world of options available for beautiful pieces that don’t involve a forge -- in fact, if you've got nail polish, you’re already halfway there.
Making your own jewelry with nail polish and findings is super duper simple. It’s more or less a matter of finding the right bits, painting them, and gluing them together.
And I've got some tips and tricks to help you do it as well -- as cheaply as possible.
Part 1: Finding your Findings
There are approximately a billion sites selling DIY jewelry findings online these days, and the sheer variety can be overwhelming -- let alone the language used.
When I first started researching this whole thing, I had no idea the parts you use to make jewelry were even called “findings.” I was just bashing away on Google looking for “pendant bits” and “pendant metal part” with very limited success.
To save you the frustration, here’s a really quick primer on some basic terms to plug in that will actually bring up the bits you want.
From the top left we have: a lobster clasp, jump rings, and glue on bails. Those are used to make pendants out of things that don’t come with a loop for the chain.
Those are cabochons on the left and bases or blanks on the right. Keep in mind “cabochon” can also mean anything from resin roses to Hello Kitty heads, so be sure to look for “clear glass cabochons.”
I’ve learned that with finding suppliers, the lower the price, generally the riskier the purchase, and the longer you will need to wait for it to arrive.
At the higher end of the price scale and lower end of the patience scale, I’ve always found Rings ‘n’ Things, Fire Mountain Gems, and Rio Grande extremely reliable. Their stuff is great quality, very consistent, and ships quickly.
If you’re willing to wait a bit longer in return for paying a little less, there’s 8 Seasons -- I know the website looks INCREDIBLY dodgy, but I swear I've ordered from them a bunch of times. The goods always show up. They do ship more slowly, and the quality is sometimes a bit less consistent, but it’s SO CHEAP.
Of course, if you’re really after the cheapest possible option, eBay is always the way to go. Beware though -- there are a LOT of scam artists selling stuff for suspiciously low prices. The dodgy sellers will almost always hand your money back if you hassle them enough, but it’s a pain in the behind that I’d rather avoid.
My favourite seller is Millie*n because her shipping is always reliable and (relatively) fast, but there are plenty of others to try out, like BeadCraftStore and Spottoland.
Keep in mind -- when ordering from somewhere like China (where most of these stores are based) that economy international postage is slow. Like, snail trying to swim through molasses slow. Sometimes the package shows up in a week, and that’s awesome! But more often it’ll be a fortnight, or a month before you see your bits.
When trying a new eBay store, I’d advise against buying more than a couple of things until you know they’re not one of the dodgy ones -- that way if they rip you off, you’re only losing a couple of bucks.
As well as all your parts, you’ll need glue to stick it all together. Personally, I like using E6000 industrial adhesive -- and it’s available from all the finding sites I mentioned, as well as Amazon, or some brick-and-mortar crafting stores.
If you don’t want to throw down for special industrial adhesive, I’ve been informed that Liquid Nails in Clear will also do the trick.
Don’t use regular superglue -- it’s too brittle, and will crack the first time the parts shift at all. E6000 and Liquid Nails are both flexible, so they can keep two hard surfaces bonded without cracking.
Also, don’t try and use PVA or “white” craft glue -- it’s rubbish at sticking nonporous surfaces together. And even if you get it to stay together, it’ll dissolve the first time it gets damp.
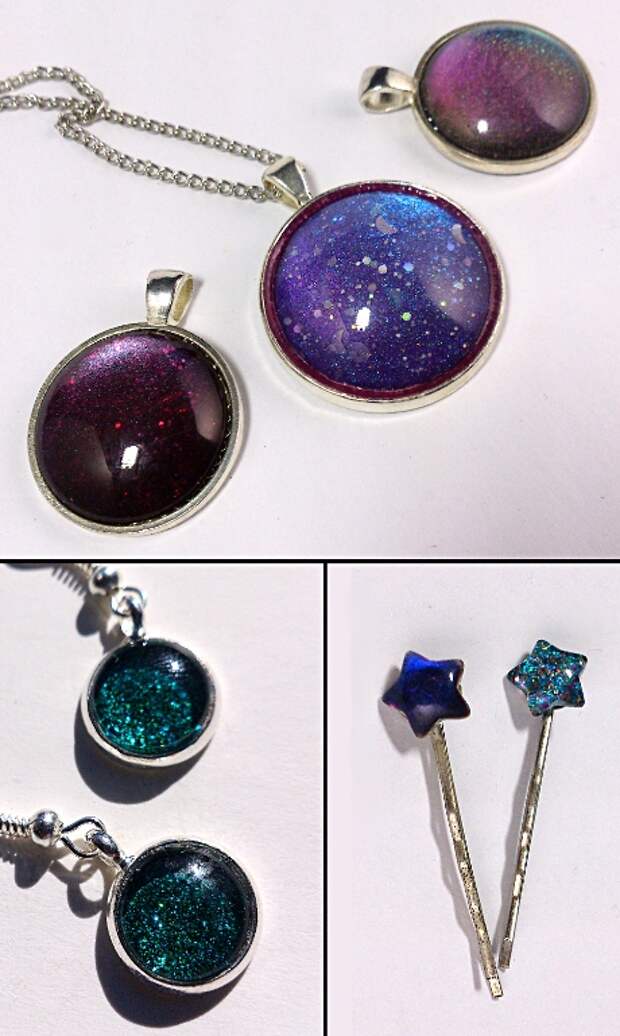
So, let’s assume you want to make a pendant like the ones pictured right up at the top. You’ll need to pick a nail polish. You'll also need a cabochon and a base that fits it, glue, and either parts to make a chain or a chain to string it from. Once you’ve got those, we can move on!
Part 2: Making It Go
First up, paint the back of your cabochon with polish.
Tips:
- Use blu-tac, clay, play doh, or whatever malleable substance you have around to make a little stand for the cabochon, to hold it steady while you paint.
- If you're using a glittery polish, dab it on rather than swiping, so you get a nice oozy coat of the base color, filled with lots of glitter.
When you’ve got a nice even layer, put the cabochon down and leave it alone.
Like, seriously, just go on with your life for about 24 hours. If it’s too transparent after one layer, come back the next day and do another layer. Then leave it alone for another 24 hours.
Don’t poke it, don’t hold it up to the light “just to see”, don’t go back and try to do another coat after an hour -- learn from my stuff ups, and just leave it alone.
If it’s extra hot, or extra cold, or humid, this drying time is EXTRA important. If in doubt, leave it longer.
Once the polish is thick enough and has dried all the way through, it’s important to seal the polish in with something before you glue it to your base.
This is one of the things I wish someone had told me when I started because now a lot of my first attempts are now totally unwearable -- the glue has bleached the color entirely out of the polish. Not awesome!
However, a quick coat of clear topcoat polish, or acrylic paint sealant, or basically any waterproof craft type sealant will do the trick. Once you’ve sealed it, let it dry for a couple of hours.
(I still make this series of faces EVERY TIME. I hate waiting so very, very much.)
When it’s dry, smear some glue on the back of the cabochon and also in the base. Let it set for a couple of minutes before smooshing it together.
Try not to smoosh all the glue out of the base again, but if some comes up the sides, don’t sweat it.
You can get that when it’s dry -- which it won’t be for at LEAST 24 hours.
Yes, seriously, you need to leave it alone for another 24 whole hours. Don’t touch it, don’t breathe on it, don’t jostle it -- E6000 glue and Liquid Nails both need a full 24 hours totally undisturbed to set properly.
If you can summon the patience, 48 hours of alone time is best. It LOOKS like it’s dry in about an hour -- but those glues are deceptive and tricksome and are not to be believed. Just trust me, 24-48 hours of dry time and you’ll avoid nasty surprises down the track.
Once the piece is at long last totally dry, use a craft knife to trim off any stray glue that’s escaped the base. If there’s a noticeable gap between the cabochon and the edge of the base, you can also put a thin layer of sealant or Modge Podge down in the gap to help prevent dust and muck gathering in it over time.
Once THAT is dry, YOU’RE DONE. No, seriously, I promise no more waiting now.
When you get compliments (which you absolutely will), remember to respond casually, “Oh, this? Just a little something I made.” The smug satisfaction totally makes up for all the endless waiting involved in the process.
And that’s more or less it! Be sure to drop any questions in the comments, and I’ll be happy to answer them if I can.